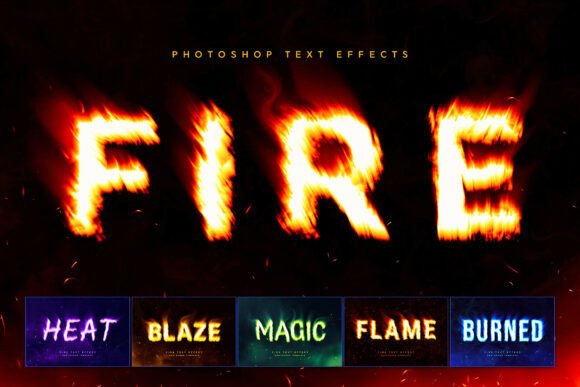
Fire Text Effects: Ignite Your Typography with Realistic Combustion
There is a distinct difference between text that merely sits on a screen and text that demands attention. Fire Text Effects bridges that gap by transforming standard lettering into a blazing inferno, complete with roaring flames, smoky plumes, and organic flying embers. This toolkit is not just a collection of filters; it is a premium suite of Photoshop templates designed to wrap your typography in volumetric lighting and heat distortion waves. Whether you are building a cinema-ready title screen or designing a high-impact album cover, the goal is to create an atmosphere where the viewer feels the heat.
However, simply downloading a template does not guarantee a professional result. Many creators make the mistake of treating these tools as a "one-click fix" without understanding the underlying workflow or the specific needs of their project. To get the most out of this comprehensive generator, you must approach it with a clear strategy. Below, we discuss common pitfalls, how to avoid them, and why understanding the nuances of fire effects can elevate your design from amateur to authoritative.
Understanding the Workflow Before You Start
The primary advantage of the Fire Text Effects toolkit lies in its streamlined Smart Object workflow. The system is engineered so that you do not need to manually paint every flame or adjust individual ember particles. Instead, you double-click the designated layer, swap in your font or vector monogram, and save. The software then handles the heavy lifting, generating realistic atmospheric dark smoke overlays and heat distortion instantly.
Mistake Alert: A frequent error beginners make is attempting to edit the fire layers directly rather than replacing the text within the Smart Object. If you try to manually move pixels around the fire effect, you risk breaking the procedural generation logic. This leads to jagged edges, misplaced shadows, and a loss of the cohesive "burnt" look. Always remember: the fire is dynamic, but your text input must be static within the template structure.
Choosing the Right Chemical Style Variation
This generator includes six distinct chemical style variations, ranging from classic orange embers to mystical green and ethereal blue glows. While having options is beneficial, choosing the wrong one can undermine your message. For instance, using a mystical green glow for a hardcore metal band logo might confuse the audience, making the design feel less aggressive and more fantasy-oriented. Conversely, a classic orange ember is universally understood as intense heat and danger.
Practical Advice: Match the color temperature to the emotional intent of your brand or event. If you are creating graphics for an action movie trailer, stick to the high-contrast oranges and reds that signify urgency. If you are designing for a sci-fi game stream, the ethereal blue glow might better convey energy and technology. Do not default to the first option you see; evaluate which variation communicates your specific narrative best.
Common Pitfalls in Application and Usage
Even with a powerful tool like Fire Text Effects, the final output depends heavily on how you integrate it into your broader composition. One of the most overlooked details is the interaction between the fire effect and the background. Fire requires contrast to be visible. Placing a bright, burning text effect over a similarly bright or complex background will cause the flames to disappear, rendering the effort useless.
- Lack of Contrast: Ensure your background supports the intensity of the flames. Darker backgrounds often enhance the luminosity of the fire, while light backgrounds may require you to add drop shadows or darken the area behind the text.
- Ignoring Heat Distortion: The toolkit generates heat distortion waves, but if your text is too small, these waves can become pixelated or muddy. Use large, bold fonts for headers and titles where the distortion effect can breathe.
- Overusing Embers: While flying embers add realism, too many can clutter the design. In a crowded layout, such as a YouTube thumbnail, prioritize readability. If the fire obscures the text, reduce the opacity of the ember layers or switch to a cleaner variation.
File Quality and Font Compatibility
The package includes six high-quality PSD files and a PDF with font links and instructions. However, users often skip reading the instructions regarding font compatibility. Some fire effects rely on specific stroke widths or kerning to work correctly. If you substitute a font that is too thin or has irregular spacing, the fire texture may not adhere properly, leaving gaps or uneven burns.
Solution: Before finalizing your design, check the included PDF guide. It provides the recommended typefaces that interact best with the Smart Objects. If you must use a custom font, ensure it is converted to outlines (vector) before placing it into the template. Rasterized text at low resolutions can look jagged when wrapped in fire, ruining the illusion of combustion.
Strategic Applications for Different Audiences
The versatility of this toolkit makes it suitable for a wide range of industries, but each sector has unique requirements. Understanding these nuances helps you avoid generic results.
Gaming Graphics and Streams: For esports logos and team emblems, aggression is key. Use the classic orange embers combined with the heat distortion waves to simulate the intensity of competition. Avoid soft, glowing variations that might dilute the competitive edge your team wants to project.
Music Album Covers: Rock, metal, and trap artists often need layouts that scream rebellion. Here, the "roaring flames" aspect should be prominent. Consider using the darker smoke overlays to create a sense of mystery and depth behind the fiery text. This adds a cinematic quality that separates professional covers from amateur fan art.
Movie Event Posters and Flyers: Action trailers and Halloween flyers benefit from the dramatic lighting provided by the toolkit. The volumetric lighting generated by the system mimics real-world stage lighting, making your poster stand out in a digital feed. Just ensure the text remains legible even when viewed at a distance or on mobile devices.
Streetwear Apparel: When creating graphic placements for t-shirts and hoodies, keep the design scalable. Fire effects can lose detail when printed on fabric. Test your design at the intended print size to ensure the embers and smoke don't blur into a single blob. The bold, fiery aesthetic works well for urban fashion, but clarity is paramount.
Social Media Content: For scroll-stopping thumbnails and Instagram headers, speed and impact are everything. The streamlined workflow allows you to produce these assets quickly, but don't sacrifice clarity for speed. Ensure the text is large enough to be read on a small smartphone screen without squinting.
Evaluating Your Final Output
Before you download, publish, or print your design, perform a final quality check. Does the fire look integrated, or does it look pasted on? Are the shadows consistent with the light source? Is the text readable against the chaotic background? These questions separate a good design from a great one.
If the result feels flat, consider adding a subtle vignette to the corners of your image to draw the eye toward the center. If the colors feel too harsh, slightly desaturate the background elements to let the fire pop. The Fire Text Effects toolkit provides the engine, but you are the driver. By avoiding common mistakes, respecting the workflow, and applying strategic choices, you can transform any ordinary text into a compelling visual statement.
Ultimately, the value of this resource lies in its ability to democratize high-end visual effects. You do not need to be a master of Photoshop to achieve a cinema-ready look, provided you understand the rules of engagement. Use the included instructions, respect the Smart Object limitations, and choose your chemical styles wisely. With these precautions in mind, you are ready to ignite your typography and captivate your audience.